



Most people treat their core like a six-pack vanity project. That is a mistake. The core is actually your body’s internal brace. It includes the abdominals and lower back muscles that keep your spine stable. Without that stability, basic movements like standing or walking become a chore. Weakness here leads to poor posture. It also leads to chronic backaches. And in worst-case scenarios, it invites injury.
You need exercises that hit those hard-to-reach stabilizers. Not just the visible abs. We are looking at variety. Angles matter.
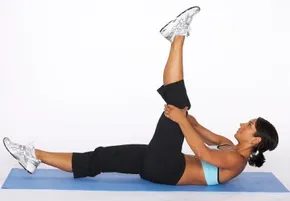
The first move in this sequence is the single-leg kick. It sounds simple. It is deceptively tricky. The goal is to strengthen without breaking your back. Specifically, you must not arch your lower back. If your spine curves upward, you have failed the form. Keep that lower back pressed flat against the floor. This prevents injury and forces the deep muscles to do the work.
The Execution
Start by lying flat on your back. Engage your upper body immediately. Lift your head, neck, and the top of your back off the floor. Hold that position. Do not let them drop.
Now for the legs. Keep them straight. This is non-negotiable. Lift one leg up toward the ceiling. The other leg hovers just above the floor. Both legs are active. Neither touches the ground.
“Keep the lower back pressed to the floor to prevent injury.”
This specific angle targets the core from a direction most people ignore. It forces isolation. It demands control.
Stabilize and Switch
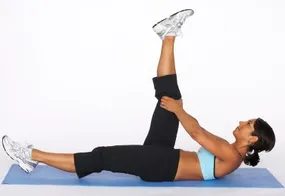
Here is where most people lose form. Once you have the first leg extended, gently pull it back down while simultaneously lifting the other leg toward the ceiling. It is a controlled motion. Do not let gravity do the work for you. The switch should be smooth, not jerky. If you feel your hips rocking, you are moving too fast.
Keep the Core Engaged
Your lower back must stay glued to the floor. This is non-negotiable. If your spine arches, you have stopped engaging your core and started using your hip flexors instead. That defeats the entire purpose of the exercise. Keep your abs contracted throughout the movement. Think about pulling your belly button toward your spine. This protects your lumbar region and ensures the rectus abdominis actually does the lifting.
Where to Go Next
If you have mastered the basic stability ball crunch, you are ready to add resistance. The stability ball crunch with a medicine ball is the logical next step. It forces your core to work harder to maintain balance while handling external weight. It also improves coordination between your upper and lower body.
For those looking to build out other areas, consider these specific routines:
- Total Body Workout Routine for overall muscle balance.
- Weight Lifting for Women to strengthen bone density and lean muscle.
- Warm-Up Exercises to prevent injury before heavy lifting.
- Ab Exercises to complement your core work with variety.
- Arm, Chest, and Shoulder Exercises for upper body strength.
- Stretching protocols to maintain flexibility.
How to Do a Stability Ball Crunch with Medicine Ball
Adding a medicine ball changes the equation. You are no longer just stabilizing your body; you are moving a load. This increases the intensity significantly.
Sit on the ball with your feet flat on the floor, knees bent at 90 degrees. Hold the medicine ball with both hands at your chest. Lean back slightly until your abs are engaged and your lower back is still in contact with the ball. Crunch up by lifting your shoulder blades off the ball. Exhale as you contract. Lower yourself back down with control. Do not bounce. The eccentric phase is where the muscle growth happens.
Why the Stability Ball Crunch Works
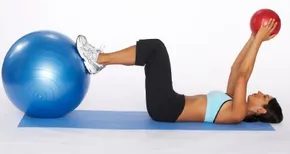
This isn’t just another core workout. It’s a targeted way to hit the midsection by forcing your body to stabilize while you move. You need two simple tools: a stability ball and a medicine ball. The setup is straightforward. Lie on the floor. Place your feet on the stability ball.
Getting Into Position
Start by lying flat. Your feet should rest securely on the stability ball. This is where the tension begins. Your legs aren’t just resting. They’re holding you up. The ball is unstable by design. That instability demands engagement from your lower abs and hips. You aren’t just crunching. You’re balancing.
“You’ll need a stability ball and a medicine ball for this abdominal crunch.”
The first step is purely positional. It looks simple. It is deceptively difficult. If you wobble, you’re failing the stability test. Keep your feet planted. Keep your core tight. The exercise relies on this foundation. Without it, the medicine ball part becomes a mess.
Adding the Load
Once your feet are set, you’re ready for the load. This is where the medicine ball comes in. But the instructions stop at the start position. The actual crunch happens next. You lift your shoulders. You bring the ball toward your chest. The ball adds weight. The ball adds resistance.
Why use a medicine ball? It’s not just about getting stronger. It’s about functional strength. You’re mimicking a real-world motion. You’re lifting something while your base is unstable. That’s the key. Most crunches are done on a flat floor. Your spine doesn’t have to work as hard. Here, the core works overtime.
The Hidden Challenge
Most people skip the stability part. They treat the ball like a prop. That’s a mistake. The ball forces your body to react. Micro-movements happen constantly. Your body corrects. That correction is exercise. You don’t just crunch. You stabilize.
This is why it’s a “terrific” way to strengthen. It hits multiple angles. It engages deep muscles. It’s not just the six-pack. It’s everything underneath. The instability is the point. If you can do it without wobbling, you’ve got a strong core. If you fall off? You need more practice.
What to Watch For
Keep your movements controlled. Don’t rush. The medicine ball should move with you. Your feet shouldn’t slip. If your feet slide, adjust your grip. Use your toes. Dig in slightly. The stability ball is slick. Friction matters.
You’re not just lifting weight. You’re balancing it. That’s the difference. A regular crunch is linear. This one is dynamic. It’s harder. It’s more effective. And it only requires two pieces of equipment. That’s the beauty of it. Simple tools. Complex engagement.
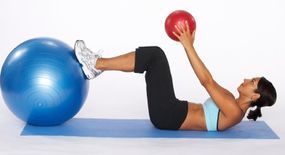
You have finished the preparatory phase. Now comes the movement that actually does the work.
The Mechanics of the Lift
Lift the medicine ball. Do not just hold it. Drive it upward and outward. Aim for a trajectory that takes it past your knees. This isn’t a static hold. It is a dynamic extension.
Engaging the Upper Body
Here is where most people cheat. They keep their head down. Don’t do that.
You must lift your head, neck, and shoulders off the floor. If your upper back stays glued to the mat, you are not engaging the core. You are just lifting your arms. Lift the shoulder blades. Clear the ground.
Why It Matters
This elevation changes everything. It increases the range of motion. It forces your rectus abdominis to work harder than a standard crunch would. The medicine ball adds resistance. The leg elevation adds tension.
Related Resources for Strength
If this movement clicks for you, you likely want more like it. Here is where to look next:
- Total Body Workout Routine — For balanced development.
- Weight Lifting for Women — To build functional muscle.
- Warm-Up Exercises — To prevent injury before you start.
- Ab Exercises — To vary your core routine.
- Arm, Chest, and Shoulder Exercises — For upper body strength.
- Stretching — To maintain flexibility.
How to Do an Elevated Leg Crunch
The elevated leg crunch is not just about abs. It is about control. You are stabilizing your lower body while twisting or crunching your upper body.
Setup and Form
- Lie flat on your back.
- Elevate your legs. Straight or bent? Both work, but straight legs are harder.
- Hold the medicine ball at your chest.
- Crunch up. Lift those shoulders.
Common Mistakes
Pulling on your neck is bad. Use your core. If you feel strain in your cervical spine, slow down. Lower the weight.
The Result
Consistent practice here builds a stronger midsection. It improves stability. It helps with everyday movements.
There is no magic. Just repetition. Proper form. And the discipline to lift your head when your body wants to stay down.
Keep going.
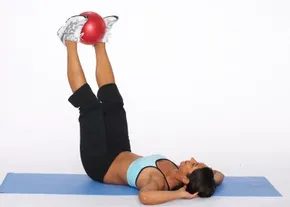
How to Perform an Elevated Leg Crunch with a Ball for Deeper Core Activation
Forget the heavy medicine ball for this move. If you are trying to isolate the abs without turning the exercise into a shoulder workout, elevated leg crunch with a lightweight ball is the smarter choice. Using a weighted ball shifts the load to your grip and upper body, taking tension away from the midsection. A standard foam ball, exercise ball, or even a rolled-up towel works best here.
The Setup
Start by lying on your back. Knees bent, feet flat. Place a non-weighted ball between your ankles or just above your knees. Squeeze it lightly to maintain connection. This small point of contact provides the resistance needed to engage the inner thighs and stabilize the pelvis.
Why Lightness Matters
Using a heavy object defeats the purpose. You want the challenge to come from the leverage and the isometric squeeze, not external weight. The ball acts as a tool for tension, not mass. When you press against it, you are forcing the obliques and transverse abdominis to work harder to keep your hips stable.
The resistance isn’t in the weight of the object. It is in the constant isometric tension you maintain between your legs.
Execution
- Lift the legs. Raise your feet until your shins are parallel to the floor. Keep the ball in place.
- Engage the core. Pull your belly button toward your spine. This prevents your lower back from arching off the floor.
- Perform the crunch. Slowly lift your shoulder blades off the ground. Do not pull with your neck.
- Squeeze harder. As you curl up, increase the pressure on the ball between your feet. This adds a layer of difficulty that most standard crunches lack.
- Lower with control. Do not drop your shoulders. The negative phase is where the muscle fibers tear and rebuild.
Common Mistakes
Many people use a medicine ball because they think “more weight equals more work.” This is false for this specific variation. A heavy ball forces you to use momentum or upper body strength. Stick to something light. If you cannot keep the ball between your feet without it falling or requiring excessive grip strength, you are using too much weight.
When to Add This
Integrate this into a routine when standard planks or crunches feel too easy. It targets the rectus abdominis and the deep stabilizers. It is not a replacement for heavy lifting, but it is an effective way to finish a core session.
The ball stays between your feet. The focus stays on the squeeze. Anything else is just noise.
The Mechanics of the V-Sit
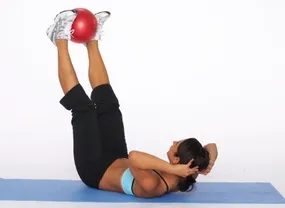
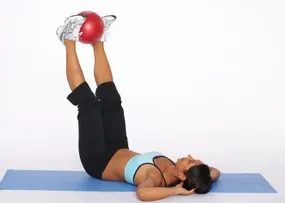
You start in the same dead-stop position as the standard crunch. Hands come up to frame your head, not behind it. The goal here isn’t just lifting your torso. It’s creating a literal “V” shape with your body.
Contract your abs. Lift your head, neck, and shoulders off the floor. Now, swing your legs up. Keep them straight if you can. The ideal form looks like a human letter V.
Return to the start. All the way down. Control the descent. Don’t just drop.
This variation hits the hip flexors harder than a standard crunch. It also demands more core stability. If your lower back arches, you’re doing it wrong. Brace deep in your stomach.
Why It’s Harder Than You Think
People underestimate the V-sit. It looks like a pose. It’s actually a full-body engagement test.
You’re using your rectus abdominis to lift the upper body. Your iliopsoas (hip flexors) are pulling the legs up. Your obliques are stabilizing the rotation. It’s a compound movement for the core.
If you have tight hamstrings, you might struggle to keep your legs straight. That’s fine. Bend your knees. The intent matters more than the geometry.
“The V-sit isn’t just about six-pack visibility. It’s about functional core strength that translates to sports and daily movements.”
Common Mistakes to Avoid
Pulling on your neck is the fastest way to ruin this exercise. Your hands are just there for balance. Or for support if you’re struggling. Don’t yank your head forward.
Using momentum is another trap. Kicking your legs up to swing your torso up? That’s cheating. It shifts the load away from your abs and onto your hip flexors. Slow it down. The burn you feel in your stomach is the point.
If your lower back lifts off the floor, you’ve lost form. Stop. Reset. Engage your core tighter. A rounded back is safer than an arched one for this move.
Building Toward the Full V
Most people can’t do a full V-sit on day one. That’s normal.
Start with a partial range. Lift your shoulders. Lift your hips slightly. Hold for two seconds. Lower.
Progression matters. Do three sets of ten. Rest. Try again tomorrow. Strength builds incrementally.
Where It Fits in Your Routine
This exercise belongs in a broader strength plan. It’s not a standalone solution.
Look into a Total Body Workout Routine for balance. V-sits are anterior-dominant. You need back work to counter the hunch.
If you’re new to lifting, check out guides on Weight Lifting for Women. Or men. The principles of progressive overload apply regardless.
Start with Warm-Up Exercises to prepare your spine. End with Stretching to release those tight hip flexors the V-sit shortens.
For more targeted work, browse resources on Ab Exercises. Or Arm, Chest, and Shoulder Exercises if you want to balance your pushing muscles.
It’s about consistency. Not perfection.
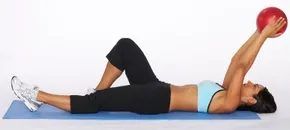
The V-Sit Single-Side Ab Crunch
Most people think core work is about doing endless crunches until their abs burn out. That approach often leads to a stiff, overdeveloped midsection that looks more like a block than a defined waistline. The V-sit variation described here flips that script. It’s not just about hitting the rectus abdominis head-on. It’s about targeting one side of the abdominals at a time. This unilateral focus forces your obliques and transverse abdominis to stabilize differently than they would during a standard sit-up. You are essentially teaching your core to rotate and stabilize simultaneously, which can create a narrower appearance at the waist over time.
Setting Up for Control
Start by laying flat on the floor. Your back should be neutral, not arched. This matters because if your lumbar spine extends under pressure, you shift the load away from your abs and onto your lower back. You want the work in the core, not in your joints.
Bend your right leg. Keep the left leg straight. This asymmetry is the key. By extending one leg, you increase the lever arm, making the movement harder on that side. It’s a simple mechanical adjustment that changes the entire stimulus.
Hold a ball (or any weighted object) above your head. This isn’t just for show. Holding weight overhead engages your lats and keeps your shoulders stabilized. It also prevents you from using momentum to swing your torso up. If you let go of the weight, you’re likely jerking your body. If you keep it tight, you’re forcing your abs to do the lifting.
“Control your muscles during the movement to get the best results from this core exercise.”
Executing the Movement
This is where most people mess up. They rush. They bounce. They treat the floor like a trampoline.
Lift your torso toward your right knee. Keep the left leg grounded or slightly lifted, depending on your flexibility and balance needs. The goal is not to touch your toes. The goal is to contract your right obliques and right-sided abs so hard that your left side has to work overtime to keep you from twisting uncontrollably.
Lower yourself slowly. Three seconds down. One second up. The eccentric phase—lowering the weight—is where muscle damage occurs, which is where growth happens. If you drop like a stone, you’re wasting half the rep.
Why This Works Better Than Standard Sit-Ups
Standard sit-ups are bilateral. Both sides work equally. That’s fine for general strength. But if you want to “whittle your waist,” you need to address the external and internal obliques more directly. Unilateral movements create lateral flexion. This is the motion that tightens the sides of your torso.
Think about it. When you bend sideways, which muscles fire first? The ones on the concave side. By focusing on one side at a time, you isolate those fibers. You’re not just building a six-pack. You’re building a corset-like strength around your midsection.
Common Mistakes to Avoid
- Swinging the legs. If your left leg is straight, don’t let it kick up to help you lift. It should stay relatively stable.
- Arching the back. If your lower back leaves the floor, stop. Reset. Your hips are not
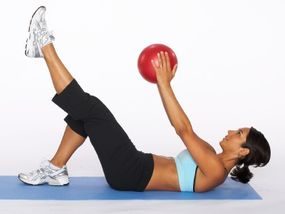
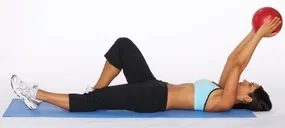
Step 5
Once you have the rhythm down, it is time to escalate. Keep your core tight and your spine neutral.
Step 6
As you lift your left leg, reach toward your toes with the ball. Do not swing. Control the movement. Lower both down with intention.
Step 7
Return to the starting plank position. Reset your shoulders. Engage your abs again.
Step 8
Switch sides. Lift the right leg. Reach for the ball with your right hand. Mirror the motion exactly.
This is not a workout you rush through. Quality matters more than quantity here. If your form breaks, stop. Correct it. Then continue.
Advanced V-Sit-Ups: Building Core Power
If standard planks feel too easy, this variation adds resistance and instability. It forces your obliques and hip flexors to work harder than usual.
Why Add a Ball?
Using a medicine ball or stability ball introduces two challenges:
- Reach: You must extend fully without losing balance.
- Load: The weight adds resistance to the lift.
This changes the exercise from a simple core squeeze to a full-body coordination task.
Common Mistakes to Avoid
- Swinging the legs: Use momentum, not muscle. If you swing, you are cheating the core.
- Rounding the back: Keep your spine straight. A rounded back invites injury.
- Holding your breath: Breathe out as you lift. Breathe in as you lower.
How Often Should You Do This?
Integrate this into your routine two to three times a week. Pair it with other strength work for best results.
Looking for More?
If you enjoyed this challenge, explore these related guides:
- Total Body Workout Routine for balanced fitness
- Weight Lifting for Women to build strength
- Warm-Up Exercises to prevent injury
- Ab Exercises for targeted core work
- Arm, Chest, and Shoulder Exercises for upper body strength
- Stretching routines to improve flexibility
The goal is not just to endure the burn. It is to build control. Master this movement, and your core will feel different. Stronger. More stable. Ready for whatever comes next.
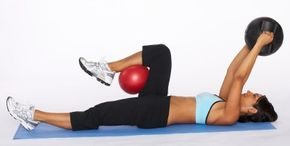
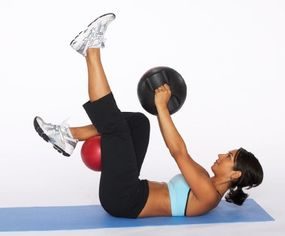
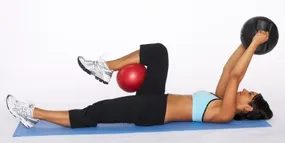
This isn’t your standard crunch. It’s a coordination test for your core. You need two things: a lightweight ball and a medicine ball. The movement demands focus. If your attention drifts, the weight distribution fails.
Step 1: The Foundation
Start flat. Lie on your back. Keep your limbs loose before you engage. The floor is your starting point.
Step 2: Stabilize the Right Leg
Bend your right knee. Slide a non-weighted ball behind that knee. This isn’t random. It forces your quad to fire just to keep the ball from dropping. It adds an unstable element to a static position. You can’t just go through the motions here.
Step 3: Engage the Upper Body
Your left leg stays straight. Extended. Taut. In your hands, hold the medicine ball directly above your head. Arms extended. This creates tension up your entire front chain. The load above your head isn’t just for show; it forces your obliques and rectus abdominis to stabilize against rotation and flexion simultaneously.
Why do it this way? The combination of a weighted overhead load and a squeezed knee ball creates multiple points of resistance. You are fighting instability from two directions. That’s what makes it advanced.
The Mechanics of the Leg Lift
Start by finding your balance. Slowly lift your left leg. Reach for the ball with your right hand, aiming for your left foot. Keep the movement controlled. Don’t jerk. If you lose your balance, you’re going too fast.
Repetition Counts
Lower back to the start position. Repeat this on the same leg. Aim for 15 to 20 reps. It should burn slightly by the final reps. That’s the point. Switch sides. Do the same number of repetitions with your right leg.
Exploring Other Strength Builders
If you want to expand your routine beyond this single move, there are established protocols. Many trainers recommend looking into a Total Body Workout Routine to ensure balanced muscle engagement. For those specifically interested in resistance training, resources on Weight Lifting for Women often address common misconceptions about building “bulky” muscle, focusing instead on tone and functional strength.
Preparation matters. Starting with proper Warm-Up Exercises prevents injury before you even touch a weight. Once you’re moving, core work is essential. Dedicated Ab Exercises complement movements like the cross-legged crunch by stabilizing the spine during heavier lifts. Upper body strength is equally important. A routine covering Arm, Chest, and Shoulder Exercises creates a cohesive physique. Finally, never skip the cool-down. Stretching improves flexibility and reduces post-workout soreness, making the next session easier.
How to Execute a Cross-legged Crunch
This exercise targets the obliques and lower abs differently than a standard sit-up. The cross-legged position adds an element of instability, forcing your core to work harder to maintain control.
- Sit on the floor.
- Cross your legs tightly.
- Lean back slightly, engaging your lower abs.
- Crunch upward, keeping your back straight.
- Lower with control.
The key here is isolation. You aren’t just lifting your torso; you’re stabilizing against the twist. It’s a subtle difference but one that changes how the muscles fire.
The cross-legged crunch setup
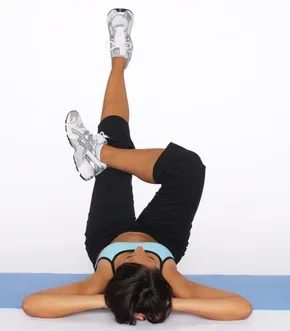
You might be tempted to just roll into the movement, but the setup matters here. Lie flat on your back. Cross your right ankle over your left knee. That is your starting line.
This is not a standard crunch. It is a variation that forces your core to work differently. The crossed leg changes the leverage. It adds a slight instability. Your abs have to fight for control in a new way.
Why symmetry is non-negotiable
Do one side and ignore the other and you create a mismatch. Your obliques will fire unevenly. Your spine might twist under load. That is a fast track to imbalance.
You must do an equal number of repetitions with each leg crossed.
If you do ten reps with the right ankle over the left knee, you do ten with the left over the right. No shortcuts. No skipping the “harder” side because it feels weird. The weirdness is the point. It is working muscles you usually ignore.
How to execute the movement
Keep your feet flat if you prefer stability. Or let the crossed leg hang. But keep the core engaged throughout. Do not let the hips lift off the ground.
Focus on the contraction. Squeeze the abdominal muscles. Exhale as you crunch up. Inhale as you lower.
It is simple. It is effective. It just requires you to pay attention to both sides equally.
Step 2
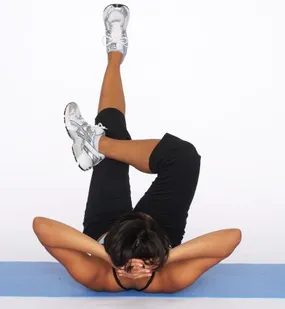
Support head with hands, and crunch straight up toward legs.
Step 3
Contract abs as you lift your head and shoulders off the floor.
For more great exercises to improve your strength and fitness, check out:
-
Total Body Workout Routine
-
Weight Lifting for Women
-
Warm-Up Exercises
-
Ab Exercises
-
Arm, Chest, and Shoulder Exercises
-
Stretching
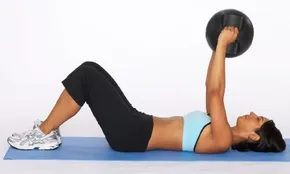
Reverse crunches are a focused exercise. They target the lower abdominal muscles specifically. If you want a sleek, strong lower belly, this move is a solid choice. Adding a medicine ball increases the challenge. It demands more stability and engagement.
Step 1
Start in the lying position. Lie flat on your back. Keep your legs straight or slightly bent, depending on your comfort. The goal is to prepare the core. Your arms can rest by your side or reach toward the ceiling. This setup ensures you are ready to engage the lower abs effectively.
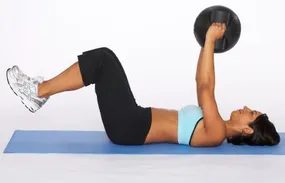
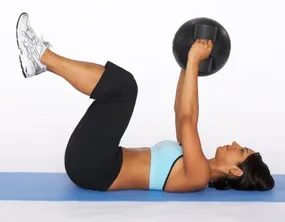
Step 2
Lift your feet off the ground. Pull your knees up toward the ball.
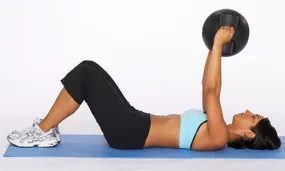
Step 3
Return to the starting position.
For more great exercises to improve your strength and fitness, check out:
- Total Body Workout Routine
- Weight Lifting for Women
- Warm-Up Exercises
- Ab Exercises
- Arm, Chest, and Shoulder Exercises
- Stretching
How to Do Bar Crunches
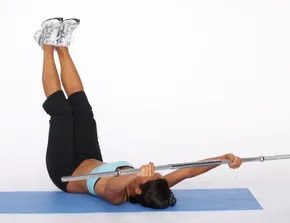
Most people treat abdominal crunches like a checkbox item. They do them fast. They use momentum. They finish before their core actually has to work. But adding external load changes the game. Specifically, bar crunches.
Using a weight bar shifts the focus from repetition count to tension time. It is a straightforward way to force the rectus abdominis to handle resistance beyond just body weight. For anyone looking to build a thicker, more defined midsection without landing in a gym that smells like sweat and regret, this is a solid addition.
The Setup Starts with Your Legs
Before you even touch the bar, you have to get into the right position. And no, that does not mean lying flat on the floor.
Assume the start position by lifting your legs up into the air. You are aiming for a 90-degree angle at the hips and knees. Your thighs should be parallel to the floor. Your shins should be perpendicular to the floor. This is the hanging leg tuck position, but without the bar yet.
Why does this matter?
If your legs are dangling straight down, you are relying on hip flexors. If they are flat on the ground, you are using momentum. The 90-degree angle isolates the lower abs. It creates a stable platform for the load.
Hold this position. Engage your core. Do not let your lower back arch. That is the trap. If your back curves, you are cheating gravity. Keep it neutral. Keep it tight.
“The resistance provided by a weight bar forces the core to stabilize against a heavier load than bodyweight alone can provide.”
Once your legs are locked in that air-bound position, you are ready to introduce the bar. The resistance is not just about lifting weight. It is about controlling it. The crunch comes from pulling the knees toward the chest against that resistance. It is a short range of motion. It is high tension. And it works.
Why This Beats Standard Planks for Hypertrophy
You might be wondering why you should bother with crunches when planks exist. The answer is simple. Planks build endurance. Crunches with resistance build size.
If your goal is a six-pack that actually pops out under a shirt, you need hypertrophy. That requires progressive overload. You cannot progressively overload a static hold in the same way. You can, however, add plates to a bar.
The bar crunch allows you to track progress. Did you lift 20 pounds last week? Try 25 this week. It is quantifiable. It is brutal. It is effective.
Common Mistakes to Avoid
- Swinging the Legs: Do not use momentum to get up and down. Control the descent. Control the ascent.
- Holding the Bar Incorrectly: Grip the bar firmly. If your hands slip, the exercise is over. Use chalk if you have to.
- Neck Strain: Do not pull your head forward. Keep your gaze fixed on your knees. Let your abs do the work, not your cervical spine.
Where to Fit It in Your Routine
This is not a warm-up exercise. This is a primary movement. Place it after your heavy compound lifts. Your core will be pre-fatigued from squ
Step 4
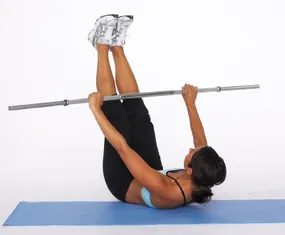
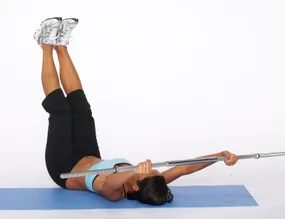
Rotate your torso so the bar touches the floor on one side of your hips. Keep the movement controlled. Don’t let it drop.
Step 5
Pull the bar back to the center and then rotate to the opposite side. This is one rep.
Step 6
Complete your set. Aim for consistency over speed. If your form breaks down, stop.
Final Thoughts
Core work isn’t just about looking good in a mirror. It’s about stability. It’s about keeping your spine safe when you lift heavy things in daily life. Or in the gym.
The oblique bar crunch targets the side muscles of your abdomen. These muscles help you twist. They help you resist twisting. Without them, your back takes the hit.
If you’re new to this, start light. The bar doesn’t need to be heavy. It needs to be manageable. You want to feel the squeeze in your sides, not your neck or lower back.
Focus on breathing. Exhale as you twist. Inhale as you return to center. It sounds simple. But it’s easy to rush.
Do this exercise two to three times a week. Pair it with other core movements. Planks. Russian twists. Leg raises.
Your midsection will thank you. Not just for the aesthetics. But for the function.
Stay consistent. The results come from showing up, not from one perfect session.
Why Obliques Matter for That Tapered Look
Most people focus on the rectus abdominis—the “six-pack” muscle running down the center of your stomach. But the obliques, those slanted muscles on your sides, are what actually carve out the V-taper and tighten the waistline. Without them, your core looks flat from the front and undefined from the side.
To target this area effectively, you need to move beyond standard sit-ups. The oblique bar crunch is a solid choice. It loads the side abs with resistance, forcing them to stabilize and contract under weight.
How to Execute the Oblique Bar Crunch
- Grip the Weight: Grab a weighted barbell or dumbbell with an overhand grip.
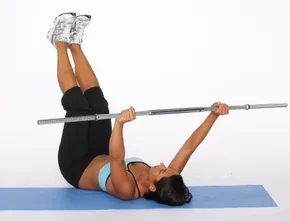
- Position the Load: Lie flat on your back. Extend your arms straight up, holding the weight directly over your chest. Your elbows should be locked.
- Lift Your Legs: Bend your knees at a 90-degree angle and lift your feet off the floor. Your thighs should be perpendicular to the ground. This is your starting position.
- Engage the Core: Brace your stomach as if you’re about to be punched. Keep your lower back pressed firmly into the floor throughout the movement.
- The Twist: While keeping your shoulders stable and arms extended overhead, rotate your upper torso to one side. Bring the bar toward the outside of your right elbow (if you are twisting to the right).
- Controlled Return: Pause briefly at the top of the crunch. Then, slowly lower the bar back to the center. Do not let the weight drop.
- Switch Sides: Rotate your torso to the opposite side, bringing the bar toward your left elbow.
- Repeat: Aim for controlled reps on both sides.
Key Form Cues
- Keep Shoulders Still: The movement comes from the spine, not the arms. If your shoulders start rolling forward, the weight is too heavy or your form is breaking down.
- No Momentum: Swing the weight using your legs or hips. This defeats the purpose and risks your lower back.
- Breathe: Exhale as you crunch/twist. Inhale as you return to center.
This exercise isn’t just about aesthetics. Strong obliques support your spine during heavy lifts and improve rotational power for sports. Start with a light weight to master the twisting motion. Once you feel the side abs burn, the rest will follow.
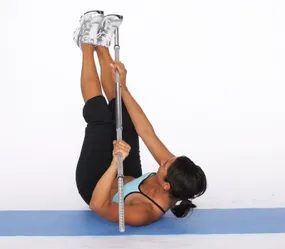
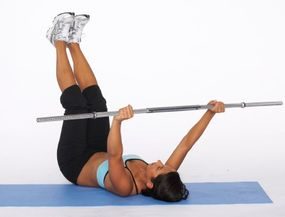
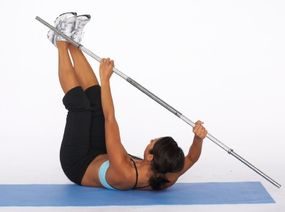
Step 2
Lift the right end of the bar. Rotate your torso so your bar points toward your right foot.
Step 3
Lower the bar back to the start.
Step 4
Flip the direction. Lift the left side now.
More Strength Work
If you are looking to fill out your routine, here are a few areas to check next:
- Total Body Workout Routine
- Weight Lifting for Women
- Warm-Up Exercises
- Ab Exercises
- Arm, Chest, and Shoulder Exercises
- Stretching
How to Do a Bent Arm Plank
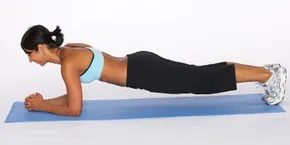
The Bent Arm Plank: A Core Strengthener That Demands Focus
Most people treat planks as a passive hold. You just stand there. You wait for the timer. But the bent arm plank? It asks for something different. It asks for concentration. The real benefit isn’t just in the time you spend doing it. It’s in how intensely you hold the position.
Step 1
Start by dropping to your forearms. Place them directly under your shoulders. Push through your toes to lift your hips. Your body should form a straight line from head to heels. Do not let your hips sag or pike up.
Step 2
Contract your abdominals. Pull your belly button toward your spine. Keep your back flat. Do not arch. Keep your gaze fixed on the floor ahead of you. Eyes down. Neck neutral.
This is not about endurance alone. It is about tension. Hold the position. Concentrate. That is where the strength comes from.
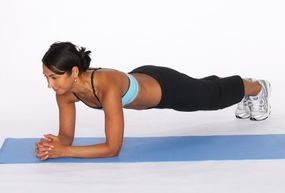
Step 3
Hold it. Push through the burn. Aim for sixty seconds if you can manage it. Start smaller if you have to, but keep building toward that minute mark. Consistency matters more than speed here.
Where to Find More
You are already putting in the work. If you want to keep the momentum going, there are plenty of other routines to explore. Look for a Total Body Workout Routine to hit every muscle group. If lifting weights is your goal, specifically check out guides on Weight Lifting for Women to get the form right.
Don’t skip the basics. A solid Warm-Up Exercises sequence prevents injury before you even start. If your core is the weak link, dig into Ab Exercises. For upper body strength, focus on Arm, Chest, and Shoulder Exercises. And when you are done? Don’t forget Stretching. It is not optional. It is how you stay flexible and pain-free.
How to Do a Straight Arm Plank
This move is different from the standard plank. You are keeping your arms straight, not bent at the elbows.
Start in a high plank position. Your hands should be directly under your shoulders. Extend your arms fully. Engage your core. Squeeze your glutes. Keep your body in a straight line from head to heels. Do not let your hips sag or pike up.
Breathe. Hold.
This variation challenges your shoulders and core stability differently. It forces you to stabilize without the support of bent elbows. If your shoulders burn, that is normal. If your back hurts, check your form.
Which part of your routine feels the hardest right now?
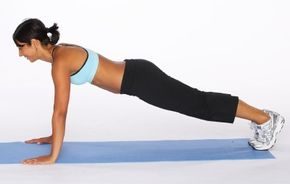
The Straight Arm Plank: Form and Function
The straight arm plank is a deceptively simple move that targets the entire anterior chain, specifically strengthening the abdominals and back muscles. It is not a variation you should rush through. Precision matters more than duration here.
Step 1: The Foundation
Start by getting into the plank position. You are supporting your full body weight on your hands and toes. This is the baseline. If your hips sag or hike up, the exercise stops working the core and starts stressing your lower back.
Step 2: Hand Placement
Position your hands directly under your shoulders. Not in front. Not behind. Directly under. This alignment is critical for shoulder health and leverage.
Step 3: The Lock-In
Contract your abdominals. Keep your back straight. Look ahead of you, not down at your hands. Your neck should remain neutral, extending the line of your spine.
“A straight arm plank builds the abdominals and back muscles.”
Hold this. Feel the tension.
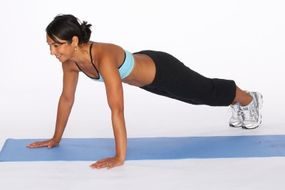
Step 4
Hold it. See how long you can manage, aiming for a full sixty seconds. Most people fail before they hit the mark. That is normal. The core is not designed to stay rigid forever.
For more great exercises to improve your strength and fitness, check out:
-
Total Body Workout Routine
-
Weight Lifting for Women
-
Warm-Up Exercises
-
Ab Exercises
-
Arm, Chest, and Shoulder Exercises
-
Stretching
How to Do a Plank on Stability Ball
The standard plank is a solid baseline. It works. But it can get boring. Or your body just adapts. When your muscles stop struggling, the gains stall. Enter the stability ball. Also known as an exercise ball or Swiss ball. It is not just a fancy prop for physical therapy clinics. It is a tool that forces your nervous system to work harder.
Why the Ball Changes Everything
You might ask why swap a hard floor for a squishy sphere. The answer lies in instability. On a flat surface, your body knows exactly where it is. The stability ball removes that certainty. Your center of mass is constantly shifting. Your brain has to fire more muscle fibers to maintain balance. This is called proprioception. It is your body’s ability to sense its position in space.
When you place your forearms on the ball, the surface moves. You cannot brace against a solid object. You must stabilize. This engages the transverse abdominis deeper than a floor plank might. It also hits the obliques harder. Your lower back muscles have to work overtime to prevent your spine from sagging or arching.
The Setup
Start with a ball that is the right size. When you sit on it, your hips and knees should be at ninety-degree angles. Too big, and you are rolling around aimlessly. Too small, and you lose the range of motion.
- Kneel on the floor in front of the ball.
- Place your forearms on the top of the ball. Hands can be together or shoulder-width apart.
- Walk your feet forward slowly. The ball should be under your shins at first.
- Straighten your legs until your body forms a straight line from head to heels.
- Engage your core. Pull your belly button toward your spine.
- Keep your neck neutral. Look at the floor about a foot in front of your hands.
This is the basic forearm plank on a ball. It looks simple. It feels like walking a tightrope.
Common Mistakes
People often let their hips drop. Gravity is always pulling you down. If your hips sag, your lower back takes the load. This leads to pain, not strength. Pull your pelvis slightly forward. Tuck your tailbone. It should feel like you are closing a car door with your butt.
Another error is looking up. The neck is part of the spine. If you lift your head, you strain your cervical vertebrae. Keep your gaze down. Imagine there is a glass ball between your arms. Do not crush it.
Progression and Regression
If this is too easy, your body has adapted. You need more challenge. Try lifting one leg off the floor. Just an inch. Keep the hips level. This removes a point of stability
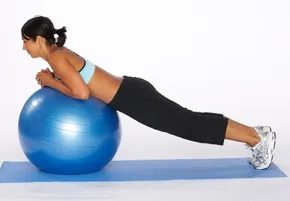
Stability Ball Plank for Core Strength
You can ramp up the intensity on your core by moving from a flat floor to a stability ball. It forces your muscles to work harder just to keep you upright.
Hold the position for as long as possible. Aim for one minute to truly tone those deep abdominal muscles.
Step 1: Setup
Start in a high plank position. Rest your chest and forearms on the ball. Keep your toes planted on the floor. This setup challenges your stability more than a standard plank ever could.
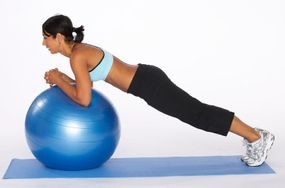
The Forearm Plank: How to Lift and Lock In
Stop resting your weight on your elbows.
Lift your chest.
Let your upper body hang from your forearms. This is the forearm plank. It is a staple for a reason. It builds core stability without straining the neck.
Keep your abdominals tight.
Contract them. Not just a little. Pull your belly button toward your spine.
Keep your back straight.
Imagine a rod running from your head to your heels.
Look ahead.
Your eyes should be fixed on a point on the floor a few feet in front of you. Do not look up. Do not look down.
If your hips sag, you’re doing it wrong. If your butt is too high, you’re doing it wrong. Stay neutral.
Hold it.
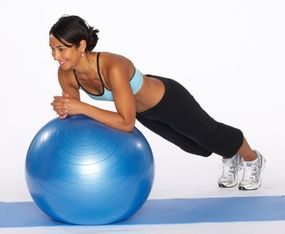
Step 4
Hold this position for as long as you can, building up to 1 minute.
For more great exercises to improve your strength and fitness, check out:
-
Total Body Workout Routine
-
Weight Lifting for Women
-
Warm-Up Exercises
-
Ab Exercises
-
Arm, Chest, and Shoulder Exercises
-
Stretching
How to Do a Cross-legged Oblique Crunch
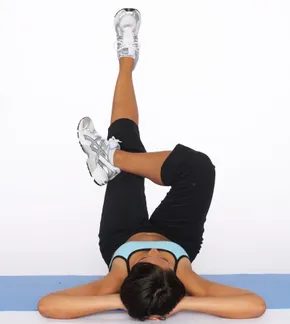
Core strength isn’t just about having a six-pack. It’s about stability. Without it, your back takes the hit. The cross-legged oblique crunch targets the side abdominal muscles effectively. But form matters. Bad form leads to neck strain. It also reduces the engagement of the obliques.
Getting Into Position
Start on your back. Flat on the floor. Use a mat if your surface is hard.
Cross your right ankle over your left knee. This creates a figure-four shape with your legs. It locks your pelvis in place. This stabilization is key. It prevents your lower back from arching. That arch is where most people get hurt.
The Movement
Place your hands lightly behind your head. Do not lock your fingers. Do not pull. Your neck is fragile. It does not need your help.
Contract your abs. Pull your belly button toward your spine. Now lift your head and shoulders off the floor. Keep the movement controlled.
Focus on the twist. You are not just crunching up. You are reaching toward your crossed knee. This rotation hits the obliques hard.
Go up. Pause. Lower slowly.
The slow descent is where the muscle actually works. Gravity does the work on the way up. On the way down, you fight it. That is what builds strength.
Stop if you feel pain in your lower back. Discomfort in the abs is normal. Pain in the spine is not. If your neck hurts, your hands are doing too much work.
This exercise looks simple. It is not. Misaligning your hips can negate the benefits. Keep your feet grounded. Keep your spine neutral.
The obliques stabilize your torso. They help you bend. They help you twist. Weakness here shows up in daily life. Lifting groceries. Getting out of a chair. It starts with small, controlled movements.
Do you feel the burn on the sides? That is the target working. If you only feel it in your hip flexors, you are lifting too high. Lower the range of motion.
Consistency beats intensity. Ten perfect reps are better than twenty sloppy ones. The obliques respond to precision. They do not respond to momentum.
Keep breathing. Exhale as you lift. Inhale as you lower. Holding your breath spikes pressure. It does not help the core.
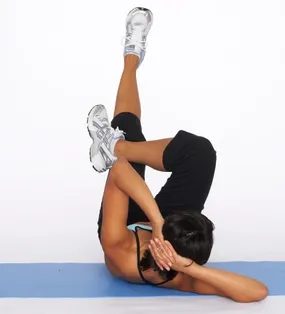
The Crunch Execution
Lower your left elbow until it brushes your right knee. Keep the movement controlled. Don’t yank your neck forward. The goal is rotation, not just getting closer. Feel the obliques engage on that side.
If this single motion feels too easy or too hard, adjust the range of motion. Quality beats quantity every time.
Expand Your Routine
That crunch is just one piece of the puzzle. You need a broader strategy for sustainable strength. Here are pathways to build on this foundation:
- Total Body Workout Routine : For balanced development.
- Weight Lifting for Women : To build muscle density without bulk anxiety.
- Warm-Up Exercises : To prevent injury before you start.
- Ab Exercises : To target the core from different angles.
- Arm, Chest, and Shoulder Exercises : For upper body proportion.
- Stretching : To maintain flexibility and reduce stiffness.
About the Guide
The advice comes from Lottie Olson, a nationally certified personal trainer. She has spent a decade in the trenches of fitness and personal training. Her academic background includes a B.S. in Exercise Science and Fitness Management from the University of Wisconsin in Oshkosh. She doesn’t guess. She applies science.