


You don’t have to run a marathon or do weight training to understand the value of stretching. You might think it’s just a boring post-workout idea, but that’s not the point. Stretching does more than just relieve dull aches and pains after a hard workout. It lengthens muscles, which directly improves your range of motion and overall flexibility. Perhaps more importantly, it acts as a protection against injuries that occur during physical activity.
But here’s the thing: even if you sit most of the day, you still need to stretch.
When you incorporate stretching into your daily routine, the benefits extend beyond the gym. It helps improve circulation throughout the body. Reduce stress levels. Release the physical tension from staring at a screen from your neck and shoulders. It’s a low-effort, high-reward approach that leads to better movement quality and less pain over time.
“Stretching can also help prevent injuries during exercise…It improves blood circulation, reduces stress and releases tension.”
The science behind stretching
Why is this especially important for the hamstrings? The hamstring muscle group consists of three muscles in the back of the thigh: semitendinosus, semimembranosus and biceps femoris. These muscles cover two joints: the hip and the knee. This anatomical setup means they are constantly under tension when you sit for long periods of time.
Sitting shortens the hip flexors and places the hamstrings in a shortened position. Over time, this can lead to tightness. Tight hamstrings aren’t just uncomfortable. they can alter your posture and gait. They might pull on your pelvis, leading to lower back pain. This limits your ability to bend forward without rounding your spine, which can put dangerous pressure on the discs in your back.
Improving hamstring flexibility requires more than just touching your toes. The purpose of this is to restore the natural length and tension ratio of these muscles. Thanks to its flexibility, it absorbs shocks more effectively. They can help stabilize your knee joint during sudden movements. It supports the stability of the hip joint, which is important in all situations, from going up and down stairs to sports.
How to stretch your hamstrings safely
Not all stretches are created equal. Some people jerk into a stretch, hoping for a quick fix. This rarely works and can actually cause micro tears in the muscle tissue. The goal is a gentle, sustained lengthening.
Here’s an easy way to target your hamstrings.
- **Find a comfortable position. ** Sit on the floor with one leg straight and the other bent inward so that the sole of the foot touches the inner thigh. This isolates the straight leg.
- **Keep your back straight. ** This is not negotiable. If you round your back, you are stretching your spine, not the hamstrings. Imagine a string pulling the crown of your head toward the ceiling.
- **Hinge at the hips. ** Lean forward from your hip joint, not your waist. Keep your extended leg straight, but don’t lock them out. You should feel a gentle pull in the back of your thighs.
- ** Breathe. **Hold this position for 20-30 seconds. Do not bounce. Bouncing causes a stretch reflex, which causes the muscles to contract.
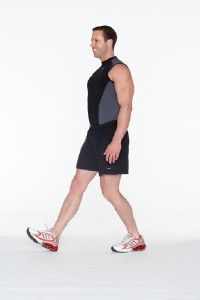

Start stretching your hamstrings
First, stand upright with your feet hip-width apart. The knees should remain relaxed. Point your toes forward or wherever feels natural. Keep your upper body straight. Distribute your weight so that it is on your heels. Let’s lower our shoulders. They shouldn’t be hunched.
Next, extend your right leg straight out in front of you. Place the foot flat on the floor. Flex the foot, pulling the toes toward your shin. Keep the knee of the extended leg relaxed. Do not lock it. This is just the first step.
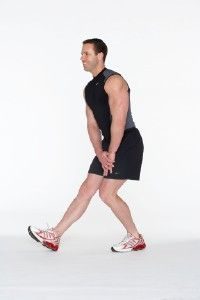
Step 2
Shift your weight back so that it rests firmly on your heels. Bend the left knee, but do not let the hip move forward. Instead, hinge at the hips and isolate the movement there instead of rounding the lower back. Plant your hands on your left thigh for stability. Tighten your core to protect your spine. Keep your neck neutral and in line with the rest of your back. Keep your back straight for 30-60 seconds. Next, switch sides.
More great exercises to increase strength and fitness can be found at:
-
Home Workout
-
Warm-up exercise
-
Arm, Chest, and Shoulder Exercises
-
Leg Exercises
This information is for reference only. Not intended as medical advice. The editors, author or publisher of Consumer Guide(R), Publications International, Ltd are not responsible for any consequences that may arise from reading or reading the information contained in this information, including treatment, surgery, exercise, dietary changes, actions or drugs. The provision of this information is not medical practice, and this information is not intended to replace the advice of a physician or other healthcare provider. Readers should seek the advice of a physician or other health care provider before beginning any treatment.
Calf stretch
Gastrocnemius stretch mechanism
Most people think of calf stretches as toe stretches, but the anatomy is a little more specific. It targets the gastrocnemius muscle, a large, bulging muscle that makes up most of the back of the calf. Unlike the deeper soleus muscle, the gastrocnemius crosses the knee joint. In other words, flexibility is largely determined by whether the knees are bent or straight. If you really want to feel the sensation of stretching, you cannot just hunch over. You need to adjust your body properly from the beginning.
Set your location
The basis of effective stretching is posture. Stand with your feet hip-width apart. This distance provides stability without restricting natural range of motion. Keep your toes pointing forward. Medial or lateral deviations can cause unnecessary twisting of the ankle and knee joints and divert tension away from the target muscles.
Relax your knees. Do not lock. But do not bend them. This is done later in the actual stretching phase. Keep your upper body elevated. A common mistake is collapsing the chest or back. This can weaken the stretch and lead to lower back tightness.
Weight distribution is important. Imagine your weight resting lightly on your hips and heels. When your weight is on your toes and the balls of your feet, you lose the force needed to pull your heels down. Keep your shoulders relaxed and not hunched up toward your ears. The tension in your neck can transfer to your spine, making the entire stretch seem harder than it should be.
A stable base not only improves balance, but also isolates the muscles you want to exercise.
This arrangement creates the desired tension line from your heels, through your calves, and up your legs. Once you are standing in this position, start the actual movement. Placing your feet in a parallel position ensures both calves receive equal attention, preventing imbalances that can lead to injury over time.
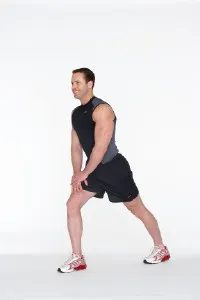
Runner’s Lunge
Go for the lunge. Bring your right foot forward and your left foot back. Place your hands on your right thigh for stability. Bend your front knee so that it is directly in line with your heel. Don’t let it cave inward. At the same time, press your left heel firmly into the floor. Feel the tension behind your left hip. Keep your feet parallel. Pointing forward. There is no twisting. Stay in this position for 30-60 seconds. You should feel a deep stretch in the front of the back hip. Next, switch legs. repeat.
This movement targets two large muscle groups at the same time. the hip flexors in the front of the pelvis. The quadriceps muscle is located in the front of the thigh. Tightness is common here. Especially if you sit all day. Or if you run a lot. Stretching can help relieve this tension. It improves mobility. It prepares your legs to move.
“Keep your body upright. When you lean forward, the focus shifts from your hips to your lower back.”
Building Functional Strength
If you want to incorporate it into a larger routine, think about how it fits in with other movements. This stretch is great for a dynamic warm-up. Prepare your body for a more intense leg workout. It also complements exercises that improve core stability. The goal is to balanced strength. This applies not only to the muscles, but also to the joints.
If you’re interested in similar movements, consider the following:
- Home Workout Routine: A full body workout that requires little or no equipment.
- Warm-up exercises: Perform dynamic movements to increase blood circulation before heavy lifting.
- Focus on the upper body: Exercises that target the arms, chest and shoulders for balanced development.
- Leg exercises: Strengthens the posterior chain to support the front-side stretches.
Important Safety Note
This information is used for educational purposes only. This is not medical advice. The editors, author and publisher of Consumer Guide (R), Publications International, Ltd. are not responsible for any consequences of the use of this information. This is not considered medical practice. It is not intended to replace the advice of your doctor or other qualified healthcare provider. Always talk to your doctor before starting a new exercise or program. Your body is unique. What works for one may not work for another. Listen.
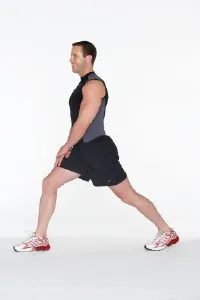
How to stretch hip flexors and quadriceps
Sitting at a desk for eight hours a day doesn’t just use up energy; Physically shorten the muscles at the front of your hips and front of the thighs. Tightness in these areas often pulls the pelvis, unbalances the spine and causes lower back pain. Releasing this tension is not only about relaxation, but also about maintaining structural balance.
Hip flexor and quad stretches aim for exactly this. It lengthens the anterior chain and return your pelvis to a neutral position. Here’s how to start with the basics and do it right.
Step 1: Build the base
Before you start training, you need a stable base. Stand with your feet hip-width apart. Keep your knees soft and don’t lock them. The toes should point forward, but you can also angle your toes slightly outward if that is anatomically natural.
Tighten your upper body by keeping your chest up and your shoulders relaxed and down. Don’t bend over. Distribute your weight evenly, but imagine sinking slightly into your heels a little. This pose strengthens your core and protects your spine at all times.
When you’re ready, take a step forward with your right foot. Next, focusing on the stretch in the right hip as you keep the back leg straight and prepare to deepen the movement.
Step 2
Keep your knees in line with your hips. Tilt your hips up. Tighten your abdominal muscles. Keep your back long. Press and hold for 30-60 seconds. Switch legs.
More great exercises to increase strength and fitness can be found at:
-
Home Workout
-
Warm-up exercise
-
Arm, Chest, and Shoulder Exercises
-
Leg Exercises
This information is for reference only. Not intended as medical advice. The editors, author or publisher of Consumer Guide(R), Publications International, Ltd are not responsible for any consequences that may arise from reading or reading the information contained in this information, including treatment, surgery, exercise, dietary changes, actions or drugs. The provision of this information is not medical practice, and this information is not intended to replace the advice of a physician or other healthcare provider. Readers should seek the advice of a physician or other health care provider before beginning any treatment.
Lower back stretch
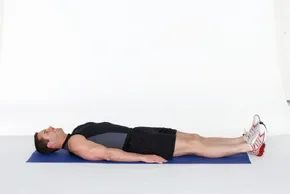

Simple measures to relieve tension
You don’t need to go to the gym or do weight training to improve your range of motion. Sometimes the most effective way to increase flexibility and encourage relaxation is to stop. This exercise is low-impact, requires no equipment, and targets your nervous system as well as your muscles.
First, lie on your back. This position, often called supine, allows gravity to work with your body instead of against it. Keep your legs straight, but don’t lock them. Place your hands naturally at your sides, palms up.
The goal is not to stretch to the point of pain. Just drop your weight to the floor.
Breathing as a primary tool
When you are calm, focus on your breathing. Take a deep breath through your nose and fill your lungs. Exhale slowly through your mouth. Repeat this cycle. Don’t rush.
As you exhale, imagine your muscles softening. Your shoulders should be away from your ears. Your jaw should unclench. The legs should feel heavy. This is not passive. It’s about releasing tensions you didn’t even know you had.
“Relaxation is not lack of activity, but ease.”
Why this works
Such static holds stimulate the parasympathetic nervous system. This is the “rest and digest” mode. Reduces cortisol levels. Heart rate slows down. For people with stiff hips or a stiff back, lying flat may be uncomfortable at first. This discomfort is a sign. Listen to it. If your lower back hurts, adjust the position a little. Placing a small pillow under the knees reduces pressure on the lumbar spine.
This is fine as long as you are breathing. Hold this position for 5 minutes. Or 10. Or until you feel a change in your body.
Flexibility comes from giving the nervous system permission to let go, not from putting force into your limbs.
The knee hug and what comes next
Let’s decide the release phase. This is where the tension is actually released from the body instead of being held in place.
Start lying down again. When you feel stable, try to pull your lower body inward, keeping your feet planted. Bend your knees slowly. Don’t rush this. Pull your legs towards your chest, as if trying to fold yourself into a smaller space.
Lift your knees and interlace your fingers behind your thighs. Pull gently. Not a yank, just enough to create a stretch in your lower back.
Keep this position.
Count to thirty. Even better if you can go to sixty. This has nothing to do with brute strength. The purpose of this is to relax the glutes and hamstring muscles. Thirty seconds feels longer than when you focus on your breath. Then slowly release. Let your legs to the floor.
Feel the difference in your spine.
If you want to build on this and build on this foundation of mobility and stability, there are other movements worth considering. The body works like a chain, and isolating one link often requires strengthening others.
If you want to expand your routine without leaving your home, consider a structured home workout routine that prioritizes form over intensity. If you want to prevent injuries before lifting weights, the proper of warm-up exercise is non-negotiable.
You can often benefit from focused attention on specific areas. For example, arm, chest, and shoulder exercises improve posture, while specialized leg exercises support the kinetic chain that protects the lower back.
A note about safety and scope.
This information is used for educational purposes only. It is not medical advice. The editors, publishers and authors involved here are not responsible for any consequences of following these instructions. Reading this article does not constitute medical practice. It does not replace the advice of your doctor or other healthcare provider.
Consult a healthcare professional before starting a new treatment, exercise program or dietary change. Your body is unique. What works for one may not work for another.
Spiral release
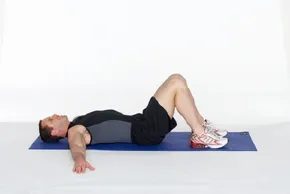
Step 1
Lie on your back. Bend your knees. Place your feet flat on the floor for grounding and stability. Extend your arms to the sides and away from the body. Place your palms flat on the ground and relax your fingers. This is the starting position. The sensation is neutral. It feels safe. But what happens next changes everything.
Side-lying hip openers
From your starting position, let gravity do the work. Carefully move your legs to the side. Don’t force it. Raise your hips just enough to feel the stretch, stopping just before each point of pain. Look over your shoulder in the opposite direction. This twist opens up the chest, while the hip lift targets the glutes and inner thighs. Breathe into the tension. Hold for thirty seconds or a full minute if you’re feeling loose. Then slowly return to the center and repeat on the other side.
Looking for more?
When building a routine that really sticks, consistency is more important than complexity. Here are some foundational categories to explore:
- Bodyweight Basics : Simple routines you can do in a small space and without equipment.
- Preparation : Why skipping a warm-up puts you at risk of quick injury and what actually works.
- Upper Body Strength : Focused movements for arms, chest and shoulders that don’t require a gym membership.
- Lower Body Strength : Basic leg exercises that support knee health and stability.
Lower Back and Hamstring Relief
When your lower back hurts, it’s rarely just your back. It is often caused by the hamstring muscles tensing and the pelvis tilting backwards. This creates a flat back that compresses the lumbar spine.
Why it matters : Tight hamstrings are a silent saboteur. Not only do they limit the depth of your squat; They change posture and lead to chronic lower back pain.
Solution : Proper stretching of the lower back and hamstrings does not mean touching the toes. It’s about lengthening the muscle belly.
- Lie on your back.
- Raise one leg and keep it straight or slightly bent if your hamstrings are very tight.
- Use a towel or strap around your foot and gently pull the leg towards you.
- Keep your opposite leg flat on the floor.
- Hold. Breathe.
Do not bounce. Stretching is a slow conversation with your nervous system, not a negotiation. If you feel severe pain, stop. Differentiate between the “good pain” of a deep stretch and the “bad pain” of a stretch.
“Exercise is medicine, but only if it’s prescribed correctly for your *body.”
The Fine Print
This text is for information only. This is not medical advice. Publishers, editors and authors are not responsible for any consequences arising from the use of this information. This is not the practice of medicine. It is not a substitute for the advice of your doctor or healthcare provider. Before starting a new exercise or treatment, talk to your doctor.
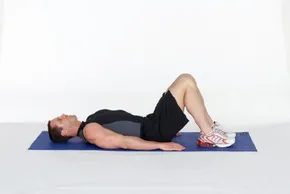
Hamstrings are not just individual muscles behind the thigh. They are a complex bridge. They anchors to your lower back and connects all the way down to the knee joint. If you think of them as just a simple rubber band, you’re missing the point. You’ll likely hurt your back instead of helping it.
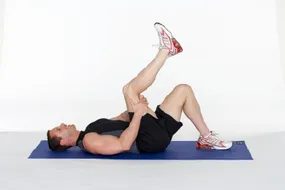
To safely stretch the entire pathway of this muscle, you need a strategy. You cannot just yank your leg up. First you need to stretch through the hamstring and lower back. Only after that you can slowly extend through the knee joint. Here’s how to get started.
Starting position
Lie on your back. This is the safest place to start. Keep your knees bent. Place your feet flat on the floor. This position protects the lower back. It allows you to isolate your hamstrings without pulling your lower back prematurely.
Get comfortable. Your body should be relaxed before stretching. Tightness in your glutes or lower back can hinder your progress. Please take a deep breath. Exhale slowly. Now you are ready to engage the muscle properly.

Step 2
Pull your right knee toward your chest. Exhale as you pull. Lower your coccyx and keep your hips in the seat to prevent common swayback compensation.
Step 3
Slowly straighten your legs and bend them until you feel a slight stretch in the back of your thighs. Don’t force it. Stay in this position for 30-60 seconds. The tension is obvious, but not painful. release. Repeat on the left side.
Other ways to improve your fitness
If you want to expand your routine beyond flexibility, consider the following:
- Home workouts with minimal equipment
- warm-up exercise to prepare the body
- Arm, chest and shoulder exercises to increase upper body strength
- Leg exercises to maintain lower body stability
Disclaimer
This content is for reference only. This is not medical advice. The editors, author and publisher of Consumer Guide(R), Publications International, Ltd. assume no responsibility for the consequences of any treatment, procedure, exercise or dietary change based on this information. This publication is not medical practice and is not a substitute for professional consultation. Always seek advice from your doctor or other qualified healthcare provider before starting a new fitness or wellness plan.
Stretching the hamstrings while sitting
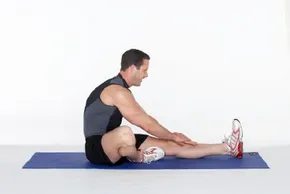
Hamstring stretching in a seated position: technique and position
Stretching your hamstrings is more than just touching your toes. It’s about alignment. When you round your back, the tension in the muscles you are trying to relax is transferred to the spine. This is an easy way to feel stiff and not loose.
The most important thing is to keep your back straight. Instead of leaning forward, think of it as increasing your height.
Step 1
Start by sitting up straight. lengthen through the spine. Move your shoulders away from your ears. Tension there can make your posture worse. Bend your right knee. Stretch your left leg comfortably. It doesn’t have to be perfectly straight. It’s just long.
Step 2
Your body slides forward. Keep your movements slow and controlled. Hold the stretch for 30-60 seconds. Let go. Switch legs. Now bend the left knee. repeat.
More great exercises to increase strength and fitness can be found at:
-
Home Workout
-
Warm-up exercise
-
Arm, Chest, and Shoulder Exercises
-
Leg Exercises
This information is for reference only. Not intended as medical advice. The editors, author or publisher of Consumer Guide(R), Publications International, Ltd are not responsible for any consequences that may arise from reading or reading the information contained in this information, including treatment, surgery, exercise, dietary changes, actions or drugs. The provision of this information is not medical practice, and this information is not intended to replace the advice of a physician or other healthcare provider. Readers should seek the advice of a physician or other health care provider before beginning any treatment.
Seated Head and Neck Stretch
Neck tension manifests itself as more than just stiffness. It continues to accumulate. The pressure is so great that you don’t even realize it’s on you until you finally let it go. Relaxing your neck isn’t just about comfort. This is done to remove weight from one area of the body that is under more stress.
No gym needed. Does not require time.
How to relieve neck tension
Start by looking for moments when you can stop. Sit higher. Elevate the spine to create space between the vertebrae. If you are sitting on a chair or on the floor, cross your ankles. Perfection is not the goal. This is stability.
Now look to the right. slowly. Not with your eyes. Use your whole head. Hold for a breath. Then move it back to the center. Look to the left. Same rhythm. Same purpose.
This is not a yoga class. This is the reset button.
Why this works
The neck is in the middle and remains tense. It is a bridge between mind and body. When we feel stressed, we clench our fists. We hold our breath. We forget to let go. Stretching the neck area can help break this cycle. It signals safety to your nervous system.
“Relax and breathe deeply as you stretch. You can do this stretch anytime as a way to relieve tension.”
You can do this at your desk. in your car. Before a meeting. During a break. It’s not about duration. It’s all about consistency.
Step 1: Basics
Sit higher. Ankles crossed. The body is lifted through the spine. Look right. Look to the left. slowly. Breathe into the tension. Let it soften. No need to rush. There’s no goal other than release.
Try it now.
Neck release for instant relief
shift your focus to the back of the neck and triceps, which are subjected to the same strain as the shoulders.
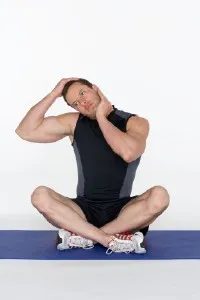
First, put your right hand behind your head. This is a simple and almost casual motion, but it requires deliberate. Gently place your left hand on your chin. This placement creates a counter-force that allows guide the movement without jerking.
Then push your head towards your right shoulder.
Don’t force it. Let gravity and light pressure do the work. The goal is not to bring your ears closer to your shoulders. Feel the stretch on the sides of the neck and the back of the arms. Breathe. Actually breathe. Most people hold their breath while stretching, but that only makes the muscles tense even more. Exhale slowly and Relax back into this position.
Hold this movement for 30-60 seconds. This may seem like a long time when you’re waiting for the clock to tick, but this is the sweet spot to stretch your muscles. Then release. Shake out the arm if necessary. Repeat the process with the left hand around the head and the right hand on the chin.
Expanding Your Routine
If you want to build on these basics, you need to explore several other targeted areas.
- An exercise routine to be performed at home that requires no equipment
- Warming up before lifting weights to prevent injuries
- Arm, chest and shoulder exercises to tone your upper body
- Leg exercises to increase muscle strength
A Necessary Disclaimer
This information is used for educational purposes only. Not intended as medical advice. The editors, author, or publisher of Consumer Guide(R), Publications International, Ltd. are not responsible for the consequences of any treatment, procedure, exercise, dietary change, procedure, or medication that may result from reading or following the information contained in this article.
The publication of this information is not a practice of medicine. It is not intended to replace the advice of your doctor or other healthcare provider. Readers should seek the advice of a physician or other health care provider before beginning any treatment.
Back and triceps stretches help stretch the upper back and the back of the upper arms. Keep the area open and flexible. This movement targets the posterior chain and releases tension from sitting at a desk or looking at a screen.
Step 1
Sit up straight and lift your body up through your spine with ankles crossed.
Step 2
Next, raise your left hand and cross it behind your back. Try to touch the middle of your back with your palm. Grab the muscle of your left upper arm with your right arm. Apply light pressure to deepen the stretch. Stay in this position for 30-60 seconds. Then let go. Switch sides. Do the same with your right arm.
More great exercises to increase strength and fitness can be found at:
-
Home Workout
-
Warm-up exercise
-
Arm, Chest, and Shoulder Exercises
-
Leg Exercises
This information is for reference only. Not intended as medical advice. The editors, author or publisher of Consumer Guide(R), Publications International, Ltd are not responsible for any consequences that may arise from reading or reading the information contained in this information, including treatment, surgery, exercise, dietary changes, actions or drugs. The provision of this information is not medical practice, and this information is not intended to replace the advice of a physician or other healthcare provider. Readers should seek the advice of a physician or other health care provider before beginning any treatment.
Chest Stretch
Sitting at a desk or driving a car for long periods of time doesn’t just tire your brain. Your posture is distorted. Roll your shoulders forward. The chest caves in. This general round shape is not just cosmetic. It compresses and shortens the muscles in the front of the body, forcing it into a fixed, restricted shape.
Stretching the chest has a direct effect on this. Target tight pectoral muscles by forcing them to stretch and expand your chest. You don’t fix your spine overnight. It’s about creating space.
The Setup
Start by finding a stable surface. A chair is best, but you can also lean against the wall if that suits.
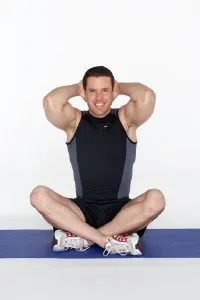
Sit tall. Imagine a rope pulling your head towards the ceiling. Lift through the spine. Crossing your ankles helps you feel your feet on the ground. This is not a yoga pose designed to test flexibility. This is a structural reset.
Place your hands behind your head. If you need support, interlace your fingers or place the heel of your hand on your skull. Point your elbows forward. They should be aimed at the wall in front of you. Don’t let them flare out to the sides. This defeats the purpose. The elbows act as the levers to open the chest.
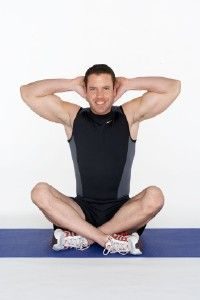
Open the treasure chest
With your hand still, focus on the elbow. Pull it to the side and push it back in. This movement forces the chest to open, contrary to the premonitions of modern life. Keep stretching. Press and hold for 30-60 seconds. Let’s defuse tensions. Then release. Repeat this cycle one more time to make sure your muscles are completely relaxed.
Build strengths elsewhere
If you want to expand your routine beyond this one part, there are several other areas to focus on. You can improve your consistency by starting with a complete Home Exercise program. Before lifting heavy objects, you should perform warm-up exercises in the correct sequence to prevent injury. In developing a special upper body, we focus on arm, chest and shoulder exercises that supplement mobility. Don’t ignore the bottom part. Includes specific leg exercises to maintain overall balance and strength.
Disclaimer: This content is for informational purposes only. It is not intended to provide medical advice. The editor, publisher or author is not responsible for the consequences of applying this information. This publication is not medical practice and is not intended to replace the advice of a physician or other healthcare provider. Always seek the advice of your physician or other qualified healthcare provider with any questions you may have regarding a medical condition or before starting a new treatment or exercise program.
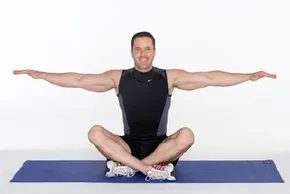
Neck and shoulder release mechanism
Excitement has a way of transferring. It starts at the shoulder, climbs to the trapezius muscle, and finally extends deep into the muscle at the base of the skull. This particular stretch target is an exact chain. It’s not just about relaxing your shoulder muscles. Actively squeeze the neck.
Step 1
Start by sitting up straight. Lift your spine as if a rope is being pulled up over your head. Cross your ankles for stability, but focus on your upper body. Extend your arms to the sides of your body and open your chest. Keep your shoulders down and away from your ears.
Cross-Body Shoulder Stretch
Target the posterior deltoid and upper back by pull your right arm in front of your chest. Deepen the stretch by gently apply gentle pressure against the right elbow or upper arm with your left hand. You want to feel it in the back of the shoulder, not your neck. Stay in this position for 30-60 seconds. Breathe steadily. Next, switch sides. Cross your left arm in front of your chest, using the right arm to press.
This movement is necessary to prevent the slouched posture common among desk workers. Your chest opens and the tension in your shoulders is released.
Related fitness resources
If you want to expand your daily routine beyond simple stretching, consider these areas of focus.
- Home Workouts: Don’t have a gym? No problem. These sessions require minimal equipment.
- Warm-up exercises: Prepare your muscles before lifting weights or running to avoid injuries.
- Arm, chest and shoulder exercises: Build functional upper body strength.
- ** Leg exercises:** Don’t forget your lower body. Strong legs support the entire kinetic chain.
Disclaimer: This content is for informational purposes only. This is not medical advice. The editors, publishers, and authors assume no liability for any consequences arising from the use of this information. This does not constitute the practice of medicine. It is not intended to replace the professional guidance of your doctor or healthcare provider. Always consult a healthcare professional before starting a new exercise program or treatment.
Side Stretch
Next, target the lateral chain. Stand with your feet shoulder width apart. Reach your right arm above your head and lean to the left. Keep your hips stable. You should feel a long and deep stretch along the right side of your torso.
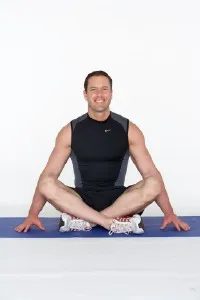
Why this stretch is important for the spine
You’re probably sitting right now with your shoulders hunched over the screen, spine compressed by gravity and habit. Most people think that stretching is just about pulling on tight muscles. This is not true. It’s about creating space. By stretching your body from the waist to the back, you eliminate the forced bad posture in your everyday life. This particular exercise targets the often overlooked connection between the pelvis and the thoracic spine. It’s not complicated. All you need is your body weight and a chair. But for many people, it becomes clear how much stress they feel without realizing it.
How the seated spinal lift works
Let’s start with a simple one. Sit tall. This is not a suggestion. This is the foundation. The stretch will fail if your spine is curved like a question mark. You have to lift your body through your spine. Imagine a rope tied to the top of your head and gently pulled upwards. engage your core at the same time. This stabilizes the lower back. Cross your ankles. Yes, cross them. This simple act locks your hips into a neutral position, preventing them from rotating and compromising the integrity of the stretch. It forces the energy into your back instead of your knees.
Step 1: Anchor point
Sit up straight and lift your body up through your spine to cross your ankles. Place your feet flat on the floor or in the air if the chair is high. The key is alignment. Your ears should be in line with your shoulders and your shoulders should be in line with your hips. Don’t lean back. Do not slouch forward. Find the sweet spot in the middle where your bones support you, not your muscles. This is your anchor point. From here, the work begins.
Breathing is a tool, not an afterthought
Breathe. Just relax. This is where most people rush. They breathe in, reach out and breathe out, treating breath as an accessory to the movement. it is not. Breathing is the mechanism that allows your nervous system to downshift from “fight or flight” to “rest and digest.” Tight muscles are often a response to stress. By slowing down your breathing, you send safety signals to your body. Muscles only relax when they feel safe. So breathe deeply into your belly. Feel your ribs expand. Hold for a second. Then slowly exhale and release the tension from your chair, lower back, or lower back.
The Lift: Creating Space
Now let’s start stretching. Do not pull with your arms. Use your breath. As you inhale, pull your tailbone down slightly engaging your pelvic floor. As you exhale, visualize your spine elongating. Lengthen through the waistline. Imagine your torso becoming taller, wider. It’s not about touching toes. It is about creating intervertebral space. Each vertebra is a small bone. Between them are discs that act as shock absorbers. When you are slumped, these discs compress. Stretching gets the fluid flowing back and lubricates your joints. That’s why it feels so good. This is physiological. This is not magic. This is mechanics.
Avoid common mistakes
- Leaning forward: Leaning forward
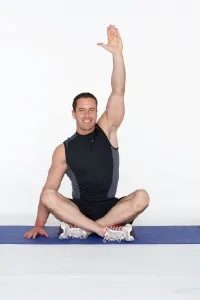
Sidebend variations
Once you’ve mastered the basic positions, it’s time to add strength. Raise your left arm straight up towards the ceiling. This isn’t just about reaching; Pull the top of your head away from your shoulders while lengthening your entire spine. Imagine a rope tied around your head and being pulled upwards.
Make sure the core is firmly in place. If your lower back feels unstable, place your right hand on the floor behind you for support. This anchor helps to stabilize the lower back so that twisting occurs higher in the body instead of the lower back collapsing.
Deepen the stretch by bending your right elbow. It’s not just leaning. You are actively pulling the right side of your chest inward. Stay in this position for 30-60 seconds. Breathe into the tightness. You should feel a stretch from your armpits to your hips. When you’re done, slowly release your hand. Next, repeat the movement by flip sides and raising your right arm.
Why this is important for posture
Although we usually think of stretching after a workout, torso reach have a different purpose. It targets muscles like the quadratus lumborum and the obliques, the lateral flexors of the spine, which tighten from sitting at a desk or hunching over phones.
“Chronic tension on the sides of the body can restrict breathing and worsen spinal alignment.”
When you do this side bend regularly, you can do more than just relax. It improves your ability to rotate and extend, which is essential for everything from lifting groceries to swinging a golf club.
Other actions to improve functionality
If you want to supplement your daily routine, consider these targeted exercises.
- Home workout : A simple bodyweight routine that requires no equipment.
- Warm-up exercises : Dynamic movements prepare joints and muscles for action.
- Arm, Chest and Shoulder Exercises : Focus on exercises that improve upper body stability and strength.
- Leg exercises : Basic movements for lower body strength and balance.
Safety instructions
This information is used for educational purposes only. Not intended for medical advice. Neither the editors, publishers, nor the authors is not responsible for any consequences arising from the use of this information.
These instructions are not medical practice. It is not intended to replace the advice of a qualified physician or healthcare provider. You should consult a doctor or qualified healthcare professional before starting any new exercise, treatment or diet. Your body is unique and what works for one may not be safe for another.
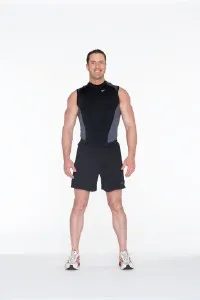
The goal here is simple. It’s all about tightening the midsection and creating a smoother silhouette. However, if your body falls to one side, it defeats the purpose. The key is length. as you reach, you need to stretch your waist, not just twist.
Correct position and alignment
First, stand up straight. The feet should be shoulder width apart. Keep your knees relaxed. locked joints can lead to injuries instead of increasing muscle strength. The toes can be pointed forward or slightly outward, allowing you to choose an angle that is natural to the hip structure.
Lift your chest. The shoulders should be kept down and away from the ears. Tight trapezius muscles can ruins the line of the torso.
“When stretching, on lengthening through the waistline as you reach.”
It’s not just about reaching a certain point. The goal is to activate the oblique muscles while maintaining spinal integrity. When your slump, your muscles disengage. Stay upright, breathe into your ribs, and start the movement from your core, not your arms.
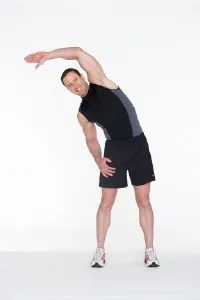
Side stretches to support the spine
You don’t need fancy equipment to stretch your body’s side chains. All you need is space and a little control.
Place your right hand flat on your right thigh. It’s not just for show. Stabilizes the spine and creates a stable foundation. Keep your back straight. Make sure it doesn’t bend or collapse.
Reach your left arm above your head. Extend it fully. Imagine elongating your waistline and creating space between your ribs and hips. This is where stretching comes into play.
Don’t bounce. Bouncing causes the muscles to release quickly, which can cause tension. Please move slowly. Control the range of motion.
Return to the start. Do this 8 times on the left side. Then switch. Place your left hand on your left thigh. Reach out with your right hand. 8 more times.
It’s very simple. It’s very direct. it works.
Related Strength Moves
If you want to continue this momentum, consider the following areas of focus:
- Home training : No need for a gym. Just consistency.
- Warm-up routine : Prepare your body before starting work.
- Focus on upper body : Target your arms, chest and shoulders to balance your strength.
- Lower Body Power : Leg exercises are the foundation of your daily workout.
Disclaimer : This content is for informational purposes only. This is not medical advice. The publisher, editor and author do not accept responsibility for the consequences of following this information. This is not considered medical practice. It is not a substitute for professional medical advice. Always talk to your doctor or other qualified healthcare provider before starting a new treatment, exercise program or dietary change. Do not disregard professional medical advice because of anything you read here. Your health is your responsibility.
Mechanism of immediate physiological recovery
You don’t need a retreat to reset your nervous system. You only need 30 seconds. The steps are simple. Take a breath. Actually, take a deep breath. Fill the lungs with air until the chest expands. Then exhale. This is not a mystery. This is biology.
Breathing deeply and forcefully activates the parasympathetic nervous system. Decreased fight or flight response. Heart rate slows down. The tension in your shoulders drops. You are actually sending a signal to your brain that you are safe.
Posture and energy flow
Positioning matters. Please sit up straight. Keep your back straight, but not stiff. Imagine your head floating up and pulling on your spine. Cross your ankles. It’s a grounded position. Avoid leaning forward in a defensive position.
Extend your arms to the sides of your body. It doesn’t matter if the palm is up or down, it’s how open it is. You create space. Stretch your back. Push against the air. Imagine your energy radiating from your fingertips. If you think about it too much, you’ll feel weird. Do it anyway. The feeling of release is usually physical, with a sudden drop in muscle tension that you don’t notice until it’s gone.
Why this works
Stress causes tension in certain areas. neck. jaw. upper back. When you extend your arms and open your chest, you mechanically force these muscles to relax. You can’t slouch with your arms extended wide. Your posture will be corrected naturally.
The combination of deep breathing and open posture is an easy way to lower cortisol levels.
This is not “emotional energy” in some vague mental sense. It’s all about proprioception. Be aware of where your body is in space. And understand that you can control it. Most of us spend all day hunched over a screen. Shoulders rounded. Bre shallow. This move reverses the pattern. immediately.
This is a small tool. Hacking the body. But when you’re stuck in the middle of a deadline or anxiety, a 30-second reset is more valuable than an hour of superficial worries. Try again. Sit tall. Breathe. release.
Reaching for Release
Raise your arms straight up. Point towards the ceiling. Move your shoulders completely away from your ears. It may seem simple, but most people carry tension there like a second skin.
Stretch your neck a little. Look up. But don’t push it. Avoid hyperextending the spine. There is a fine line between lengthening and tightening. Stay on the safe side of the line.
Hold the position. At least 30 seconds. The goal is 60 seconds. Breathe through it. Feel the space of your body opening up.
When you’re done, let it go. Release the position slowly. Imagine energy draining out through your fingertips. Let it fall away.
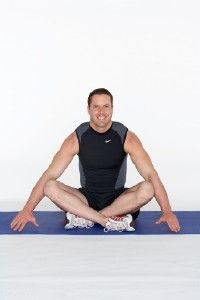
Step 3
Put your hands down. Let them hang heavy by your sides. Roll your shoulders back three times to release any tension you may have built up during the rest of the exercise. Next, take a deep breath. Breathe in completely. Hold it for a second. Breathe. This is how you reset.
If you’re looking to build strength beyond just one movement or improve your overall fitness, there are many other avenues to explore. You can start with home workout which requires no equipment. Or do a proper warm-up exercises before lifting weights to keep your joints healthy.
Make concrete plans for different goals. If you want to focus on your upper body, try the arm, chest, and shoulder exercises. If your lower body needs attention, build a solid foundation with leg exercises.
Here’s a tutorial from Lisa Faremouth. She is not just an enthusiast. She is a certified exercise instructor and a member of the American Council on Exercise and the American Aerobics and Fitness Association. Her credentials aren’t just for show. In 1989, he won a silver medal in the Midwest region at the Reebok National Aerobics Championships. His education experience complements his track and field experience.
For several years, he was the director of an exercise program at a large Chicago health club. He knows how people behave not only on paper but also in real life. He shares his expertise through training, consulting and education through his company Fitfully Yours. His seminars are delivered to fitness centers, companies and individuals around the world. He breaks down complex movement mechanisms into something that people can actually use.
The instruction is simple. Move your body. Breathe. Don’t overcomplicate the recovery phase. The rest is up to you and the work you put in next.


